AC Day 2: mid-course corrections

hood chocolate milk cardboard cap, fresh from the wall

After the workmen left yesterday, I cleared the area where they would be opening the wall in the morning, then went upstairs and tried to figure out where the equivalent opening would be upstairs. And said, “Uh oh.” The equivalent opening was right behind the radiator, right under the window. In other words, it was not a clear path from floor to ceiling.

This was a problem. What the contractor was going to do was to run coolant lines, drip lines, and electrical lines up from the basement to the attic through that bay. And the key was the copper line for the coolant. That wasn’t going to bend from one bay to another.

In the morning, the contractor confirmed my concern. We looked at all the options and figured out that the best solution was to open a bay in the office/guest bedroom instead, just inside the wall on the second floor, and meaning I had to open a little more ceiling in the basement. Sigh. But no biggie. At this point, I’m getting pretty quick at ripping down plaster, even on my lunch hour.

In the meantime, the guys were hard at work, getting the holes opened up for the vents and installing them, and doing the hard work on the wall opening. A few surprises remained. For one thing, all the contractors commented on how tough our plaster was. There were many hole saws and Sawzall blades that were sacrificed to cutting the holes in the wall. For another, we discovered the insulation material in the outside walls: an odd vapor barrier plus horsehair combination that explains our energy bills. Next priority: proper insulation.

The third surprise was the odd bits and pieces that popped out from behind the walls. I should have expected based on Aaron and Jeannie’s experiences that we would find a few things, but I wasn’t prepared for a bottle and a cardboard milk bottle cap (pictured), found in totally separate places in the house.

But at the end of the day we had:

  1. Eight outlets upstairs—three in each bedroom, one in the bathroom, one in the stairwell.
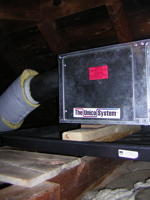
  2. Insulated mini-ducts running from the outlets to the air handler.
  3. An outlet and overhead light (though not yet connected) in the attic.
  4. Upstairs air return, installed but not yet connected to the air handler.
  5. Two opened interior walls.
  6. Electrical lines run from the panel, through the joists that were exposed in the basement ceiling, and tied off just at the base of their run.
  7. Bonus: an extra couple of electrical lines that were run by mistake and were undersized for the needs of the downstairs air handler. The electrician asked whether I wanted them connected to outlets upstairs. “Sure,” I said.

Whew. Tomorrow, we might have AC upstairs.

The sanitation of the Starbucks mermaid

If your first introduction to Starbucks was in the last few years, you may not realize that the woman in the logo is a mermaid—or that she’s holding her tails wide open in a fertility gesture. Dead Programmer traces the evolution of the logo from 15th century fertility symbol to 21st century corporate logo and explains how it has morphed over the years.

What he leaves unexplained is what happened when the first radical leap occurred, from the brown “coffee, tea, spices” logo to the green more stylized mermaid. As I recall reading in a print article about ten years ago, this happened as part of a general brand refresh (or first brand design) that also ushered in the use of subtle “steam” graphics in the packaging, the introduction of earth-toned paints in the graphics and the stores, and just about everything you think of as the modern Starbucks iconography. This all happened about the time Starbucks made the shift from mail order coffee into retail and began to appear on the East Coast. I think the article appeared in How magazine. (I can’t find the article online, but there was a recent article about the work of the in-house Starbucks design team that does appear on the How site.)

Original link via BoingBoing.

AC install day 1

unico air handler

Yesterday’s first day of installation went pretty well. Our contractors spent the morning preparing the small air handler by installing an expansion valve, then managed to load it into our small attic (in spite of a very small access panel and a very tight roofline) and spent the rest of the day preparing and insulating the main ducts and marking the locations for the ducts on the second floor. I didn’t manage to get many photos, but that’s our air handler and the very tight space around it.

A word about our installation: we are going for a full conversion. As I mentioned before, we’re getting a Unico system installed. Our setup consists of two small air handlers, the aforementioned attic one for the upper level and one in the basement for the lower two floors. Our contractor is combining this system with a high efficiency gas boiler which will provide indirectly heated hot water to coils in the air handler that will provide heat in the wintertime. As a consequence, we get to eliminate the old boiler and all the radiators.

Of course, this means the installation is a little more complex than a straightforward AC installation. So the workers are doing it in two phases. Phase 1, which is this week, is the upstairs work, plus installation of the compressor and removal of the steam radiators. Phase 2 is installation of the downstairs air handler and ducts, plus installation of the new boiler and removal of the old one. That phase will occur the week of July 4—when I’ll be at Tanglewood with the BSO, keeping cool in a different way.