Showering in the dark.

Our new shower in our first floor bathroom is finished, and not a moment too soon as the second floor bathroom is almost completely gutted now. I took the first shower in the new space this morning, and while I was looking forward to the experience it turned out not to be everything I had hoped, because it was in darkness. Yes, a transformer blew down the hill from us at about 6:10 this morning…

The good news is that our new hot water system’s big ol’ storage tank had more than enough for two showers; our old tankless hot water from our late unlamented oil furnace would not have allowed me to take a hot shower with the power off. But I wasn’t able to evaluate the lights or the efficacy of the new exhaust fan. Oh well.

Before and after photos of the new shower and of the demolition in the upstairs bathroom when I get power back at home.

Old Arlington maps

arlington 1898

Speaking of the Arlington list, someone just posted a fantastic find: a working map of the town dating from 1898. What is most interesting about this map is that it sets some theories of our neighborhood’s development on their head. I have been told by my neighbors, and even by the folks we bought our house from, that our land originally belonged to the folks who built the house next to ours on the corner, which dates to the 1920s. In fact, the map of our neighborhood not only shows Grand View Road, but shows the plots for our house and the house on either side, in more or less the places they are today. The house next to ours may have been built first, but it never owned our land.

Interesting what you can dig up if you look.

Taking care of business, in a flash: closing up the walls

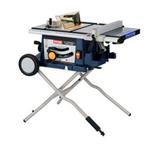
I’d like to introduce you to the table saw on the right, also known as The Machine That Saved My Ass. Ryobi isn’t a lusted after brand of power tools the way Porter and Cable or DeWalt is, but for my money and for today this is the Power Tool That Walks on Water.

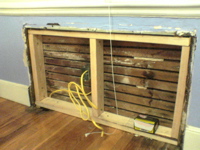
Perhaps I should back up. As I previously wrote, we figured out this weekend that we needed to trim most of the lumber we were using to frame the radiator niches so that the wallboard the plasters were to install would be flush with the existing wall surface. Unfortunately, my plan to use a circular saw hit some snags: lack of a good long work surface, inexperience with the tool, and most importantly lack of time. Because I needed to get the niches framed and insulated by Thursday morning, when the plasterers were due to start working. But I was rehearsing Tuesday night, Wednesday morning, and Thursday morning, and singing a concert Thursday night.

So basically I had Wednesday night after an abbreviated work day to rip a sill plate and top plate and studs for five wall openings, then nail them into place and insulate them. I called Lisa and shared the news. She said, “Can you get that done?” I said, “I think I need to get a table saw.” She said, quite reasonably, “But where would you put it?” Right now our garage is full of plumbing fixtures waiting to go in our upstairs bathroom, but it won’t have a lot of room even in the best case scenario. I told her I would find a portable model, and crossed my fingers.

Sure enough, the Ryobi above folds down and even has wheels to roll it away into a corner. It was pretty quick to assemble. I left the office at six, had it in the back seat of my wife’s Prizm (a tight squeeze, but it fit) by 6:40, and was home and assembling it by 7:30. At 8 pm, I connected the ShopVac to the dust port and started ripping lumber, and was done by 9. The ripping process was an absolute breeze.

I started working. The process I followed was to dry-fit the plates and studs, shim or trim where needed, and then start fastening everything together. I nailed the top and sill plates into the framing above the niches and the floor joists, respectively, using a big heavy framing hammer and some 16d nails. (My forearms are still aching, btw). Then I used construction adhesive to fasten the end studs to the finished plaster sides of the niches, and toenailed the center stud into place. I should probably have used more than three studs on some of the openings, but for the sake of time I left some wider bays.

Wednesday night I only finished two bays (and applied the adhesive to the rest) before my body shut down at 10:30. Thursday morning I got up early, insulated the bays in the kitchen and our bedroom, then cursed as I realized I had cut the plates for the living room some six inches two short. I had to leave at that point, so I kept my fingers crossed that the plasterers would not have enough time to address all the openings yesterday.

On the way from the office to the concert I stopped at Home Depot and picked up two more 2x4s, then swung by the house and ripped and crosscut them to fit, and dry fit them in the living room. I was too tired after the concert to do anything else, so I got up this morning and finished nailing and insulating the remaining bays. As I was working on the second to last one, the plasterer arrived, so I hurriedly finished it and moved on to the last bay, where I had to install an electrical box as well as nailing in the framing and insulating the cavity. Somehow I managed it and was out the door at 8, passing the plasterers who were already screwing blueboard over the first cavity.

It was a close thing, and my arms will ache for a week from all the hammering. But I got it done. Thanks, Machine That Saved My Ass! You’ve earned your precious floor space in my garage.

Radiator niches and bathroom work

Ow. Ow. Even though contractors are hip deep in our first floor bathroom renovation, we still have plenty of projects of our own, including (ow ow) framing in the niches where the radiators used to be, so that the plasterers can make them flush with the walls. This, as always, turned out to be more complex than we ever imagined.

Background: we didn’t want to find a plasterer ourselves and so had put off this project, but we’ll have one coming in to finish the walls and ceiling in our new shower. So we decided we would take advantage of his coming to have him do the work. And it turns out to be affordable, provided that we do the basic framing ourselves. So on Saturday we cleaned out all the broken plaster from the niche, which turned out to be pretty much all of it, measured, and cut the 2x4s to length. Then I started swinging a framing hammer, and learned about slow progress. Really slow project. Fortunately we finished the dining room one and I even hung a box for the outlet.

Then things started to slow down. We had to remove trim from each of the other openings—intact, if possible, since we would need to reuse it once the plastering is complete. And in some cases we needed to bring up floorboards, since we had some floor to replace where there was some water damage and need to reuse the good boards to patch the bad ones.

Then there were the two pipes, that, in spite of all our HVAC installers’ efforts, were still too high to lay floor over. Fortunately our contractor volunteered to knock one off during his lunch hour—seeing that otherwise his plasterer wouldn’t be able to finish his job. And tonight I got another one done, in spite of a nightmare of bad angles and sheer fright. (Handling a reciprocating saw to cut a few inches off a loose cast iron pipe just below our bedroom floor ranks as my least home improvement chore ever.)

But that’s done, and all the lumber is cut to length. Now I just need to rig a jig so that I can use my circular saw to trim about 5/8ths of an inch off each piece, so that the blueboard will lay flush with the wall surface or below it. A few shots of the progress here, including the shower stall pre-rough piping and tile.

The mystery of the disappearing door.

the release mechanism for the lock

While I’m pondering house changes, I can’t help but be captivated by this illustration of how to make a hidden door in a bookcase. Very cool, and solves a problem with our plans for the built in bookshelves in the library… provided I can sell Lisa on it.

We have limited space in the library room for shelves. One wall is mostly occupied by a large fireplace, and the facing wall has the staircase—which has little room for bookshelves, sadly. In the outside wall of the room is set a door, which leads to the access for the water shut-off (and also provides a convenient access behind the walls for running electrical cable to the breaker box). I had thought that the door limited what we could do with shelves on that wall, but the illustrated how tos in this article suggest we may have some options.

The choice of book for the hinge is especially good: an old volume of Sherlock Holmes. Though I might be tempted to find a more literal title, like this one, to serve as my mnemonic.

Color us nervous.

Well, today is the big day: bathroom renovations started at our house this morning. Our contractor is ripping out a closet and a half on the first floor to squeeze a shower into our half bath (which makes it now a three-quarters bath, I think). We’re a little nervous and have been forgetting important things to ask. Like: when you do the demolition, if it’s possible, could we get the floorboards out of the closet so we can patch the holes and water damage left where the radiators used to live?

This is also the point of no return in a lot of ways. Most of the other jobs that we have had someone else do have been quick and relatively painless: one day at most, even for the window replacements. The HVAC job was an exception, but it didn’t make a lot of dust and noise, as opposed to this job.

And there are so many moving parts: tile, fixtures, lighting, paint, plaster, all have to be managed separately. Our general contractor has been pretty good so far, but there are still things that we have to manage.

So we deal with it. The dogs are out of the way in New Jersey, and we’re at our respective offices IMing nervously back and forth to each other with budget numbers and details we’ve forgotten. You can say what you will about doing big projects yourself, but at least you know exactly what’s going on. Makes me wish I had set up a webcam or something.

Chore day

Happy Columbus Day—or Happy Indigenous Peoples’ Day, if you swing that way. My company observes the October holiday (and the fact that it is the only reasonable holiday candidate in October is probably why), so I have a day off for house chores.

Which is more exciting than it sounds, because there is nothing more depressing (in both the colloquial and literal senses) than a bunch of half finished projects around the house. So my goal today is to have a bunch of three-quarters finished projects when I’m done. To wit:

  • Figure out a way to use the large-diameter hole saw whose shaft too big for all my drills, so I can…
  • Drill a hole in a closet door to replace the handle hardware, for which I need to …
  • Buy non-locking door hardware, which will also allow me to…
  • Replace the closet door handle that stopped working entirely yesterday morning. After that, I can …
  • Move the pegboard from my old shop area to the new one in the garage, for which I will need either to mount some firring strips with the big concrete anchors I have or else purchase some smaller ones. After that, I can…
  • Move one of the shelf units cluttering my library into the place where the pegboard sat, and then move the other out to the garage.

But first, and most important, I need to reserve a place at the Genius Bar. This PowerBook has a bad hinge, and I need to find out if it will cost as much as I think it will to fix it.

This Old Houseblog: meeting Norm and Tom

tom silva wanna be

Lisa and I went to the studio where Ask This Old House is filmed last night and met Norm Abram and Tom Silva, who for most of us housebloggers almost need no last names, much less the mention that they are the carpenter and general contractor for This Old House. It was a fun evening and a good fundraiser for WGBH.

Alas, my cameraphone got only blurry photos (as you can see). But we heard plenty of great stories and one liners, such as Norm’s confession that he and producer Russell Morash keep the furniture that Norm builds on the New Yankee Workshop (“There are two copies of each piece, the prototype and the one that I build during the show. Russell gets one and I get the other. Sometimes a family member will get one — on loan.”) and, answering a subsequent question about how Norm chooses his projects for that show, “I look around the house and ask myself, what do I need?”

Tom Silva fielded a wide variety of questions, most (for some reason) having to do with insulation. In particular, he told Lisa that to seal the gaps left in our garage walls and ceiling when our ducts were run for the Unico system, we need to use an expanding caulk called “fire caulk”—primarily because of the garage location.

I also got a chance to shake Norm’s hand and thank him, on behalf of all us housebloggers, for the content on the This Old House website, which I told him fills the role of the New York Times for an authoritative link site for housebloggers. His eyes glazed a little when I said the word blog, but he was very polite. So there you go.

Ch-ch-ch-changes

Our work continues. By now it has probably become apparent to readers of our houseblog that we are doing very little of the renovation work on the house at this stage ourselves. We really wanted to do more of it, but I know my limits and they don’t include plumbing, framing (other than demolition), or electrical work. So we have a lot of contractors around these days.

Good news is our heating upgrade is totally complete. Our oil furnace is gone, and the oil tank was removed yesterday. After hearing some of the horror stories of accidental oil deliveries filling basements after a tank was removed, we decided that the fill pipes had to go as well, and the tank removal contractor filled in the foundation holes as part of the job. Great work and a very low price. So that’s one project that has gone to 100% complete.

Another that is close is window replacement. After struggling with storm windows and drafty main windows, we closed our eyes and opted to replace all the windows in the house with vinyl-clad wood replacements from Harvey. The windows all went in yesterday, and the final trim work was completed this morning. We need to prime and paint everything, but hope to hold off on the final paint coat until we can strip the moldings, which badly need repainting but have years and years of build-up. We considered the Silent Paint Remover but are looking at a gel-based ecologically safe paint stripper called Removall.

The new windows are really nice—though the as-yet-unprimed frames have me doing a double-take every time I see one out of the corner of my eye. And it will be nice not to have to struggle with cleaning the storm windows this year. Of course, now we have to replace the window shades too (sigh).

The last change isn’t even one that we instituted, but we’re certainly the beneficiary. The chain link fence along our driveway is being removed! Since our driveway has a choke point about halfway down where the distance between the fence and the wall is very narrow, having the fence gone is a Very Good Thing for the paint on the side of my car. Plus, our neighbor is having a bed put in with some flowering shrubs in place of the fence. Bonus!

Warm water, with gas, despite everything.

viessmann

A few projects drew nearly to an end this past week. Most notably, the installation and activation of the new gas-fired high efficiency boiler finally brought to a close our year long experiences with oil-burning heat and hot water.

As frequent readers of this blog will recall, our experiences with oil-fired steam heat have not been rosy. After a while of this, plus the expenses of oil (even on a monthly budget), we started thinking hard about other options. When we talked to the contractor who put in our Unico system, he suggested we consider a high efficiency gas boiler in its place. We considered, we thought, and we bought. And the installation, occurring this week when gas (and oil) prices jumped almost beyond recognition, seems to have come in a timely fashion. We’ll see how the bills work out, but right now it seems like a good move.

One funny note from the installation. We had the boiler on line by 3 pm on Friday. Lisa and her family came back from the beach at 4:30, and took a few showers. We ate, and later Lisa’s father reported that the water from the kitchen sink seemed cool. In fact, it was cold. My initial investigations suggested that all was well, just not working. The contractor said he would send someone out in the morning.

The next morning, Lisa took a shower and reported delightedly that there was hot water. Shortly thereafter, the contractor knocked and asked, before, I could even say anything, “You have hot water now, don’t you?” It turns out that, as he explained to me, there were two settings that were failing us. One, a power-saving setting, was set at the factory to turn off domestic hot water production between 10 PM and 6 AM. The other? The clock, which was still apparently set on German time. By my calculations, hot water had stopped at about 4 pm, and the 50 gallon tank had run out by about 9 pm—five hours later. Not too bad, all things considered, and even better now that the clock is set to the proper time.

Insulated

Well, partly insulated, anyway. A contractor came out for about two hours yesterday and insulated the attic—placed batts around the blower for the upstairs AC and blew loose fiberglass everywhere else, and installed screened, louvered vents in both gables. Last night was the first time the upstairs AC cut off before 11 PM since it was installed.

Unbelievable, how much of a difference this has made. Even with the AC there was still the sense of oppressive heat overhead upstairs. But now it feels like the whole house is cooler.

Our first month’s electricity with the AC was $50 less than our monthly oil bill during the winter. I think, thanks to yesterday’s work, that month’s bill will stand as a high water mark.

Next week: the gas-fired high efficiency boiler, at last. I spent last Sunday building a platform against our basement mechanical room wall where it will be mounted. The basement walls slope inward by about five inches about three feet off the ground, and the plumbing contractors needed a straight shot out of the bottom of the boiler for the pipes. So I bolted 3/4″ plywood to the upper concrete wall with big-ass concrete anchors; screwed two-by-fours in a square frame around the outside of the frame; screwed another layer of two-by-fours with longer screws through the first layer into the plywood; and secured a final layer of 3/4″ plywood through the two-by-fours with big lag bolts. Final result sticks out from the bottom of the wall by about 1/4″ and isn’t going anywhere.

I am, though—catching a train to Lancaster, PA on Saturday for the family picnic, then flying from Philadelphia on Sunday to San Francisco for a conference for another few days. So I’ll miss the reveal of the boiler. Maybe, though, when I get back it will be working and the old oil burner will be gone. That would be something.

Progress report: no radiators; livable master

Last week initiated the second half of our first major systems overhaul project on the house. We had completed our AC work with two working cooling zones; last week work started on the heating side with the removal of our old steam radiators and the demolition of the big steam pipes throughout the house, wherever they were visible. Our HVAC contractor did a great job removing almost all vestiges of the radiators with minimal damage to walls, floors, and ceilings.

The contractors deposited the radiators and steam pipes in the bottom of a eight-yard roll-off dumpster, which I then filled about halfway to the top with miscellaneous debris from the garage and the storage space under the stairs, including a rusted solid reel lawnmower and lawn spreader, a manual snowplow, four rusted apart metal lawn chairs, fifty-year-old trim, thirty-year-old spare shingles from the previous roof, broken storm windows (which are going to be replaced during the next major project), and all kinds of other odds and ends. Heap strong back, heap sore back.

The next step in that process will be the installation of the new boiler and connecting it to the radiant heating coils in the blowers. That project is slated for two weeks from now, so no exciting machine-room pix today.

Next: the bedroom. While I mucked out our storage areas, Lisa started painting our bedroom. This was a relief because we finally got rid of the bland cream color that was previously everywhere in the house, but it was also necessary thanks to our wall-opening escapades. I helped her finish that work on Saturday. The room is now a cool blue-grey called Yarmouth Blue, and looks much nicer.

On Sunday, we finally figured out how to rearrange our space to make room for more storage. We have had our eyes, like Aaron and Jeannie, on PAX wardrobes from Ikea. We have very limited closet space and desperately need to get some more room in a hurry; only problem was, with our cool sloping rooflines (visible in some of the photos from the beginnning of our AC installation), we didn’t have enough room to get the full 78 inches of the wardrobes in without standing the wardrobes in the middle of the floor. Fortunately, once the radiator was gone from the room, it suddenly became apparent where we should move the bed to gain the extra headroom. Bottom line, our wardrobes should be on the way shortly.

And the work continues… as always…

Wrapping up the HVAC work

Tomorrow marks the beginning of the final phase of our major surgery on our house’s respiratory system. Having installed a fully functional two-zone cooling system, our contractor team will be installing hot-water coils in the blowers, adding a new gas-fired boiler, and removing the radiators and the oil-burning boiler from the house.

To prepare, I did one last bit of ceiling demolition in the workshop/mechanical room (which now hosts my workbench on one wall and the downstairs AC system on the other), and installed plywood panels over the cement wall of the basement for the new boiler. The Viessmann boiler is a wall-mounted unit, and it will sit on the same wall as the media wiring box on the opposite side of the room from the blower. Pictures forthcoming once the work is finished.

This, needless to say, was another major cause of arm pain. Nothing like swinging a crowbar (plus a hammer and chisel to mark the line in the plaster, plus the drill for the concrete anchors to secure the panels) to really get the forearms screaming.

The shoe! the shoe!

It’s interesting when your hobbies cross with family memories. I followed a sidebar link at Houseblogs.net to discover an old family friend in a list of odd-shaped houses and other dwellings: the Shoe House in York, PA.

Driving up from Bad News, VA to my grandparents in Lancaster County, we would cut through York on Rt. 30 and would always pass The Shoe, as we knew it. We never stopped, but it was always a good sign that our six hour journey was nearing its end.

Additional information on the Shoe House and its colorful builder at an alarmingly familiarly named site.

Too many progress bars, too little time

Site maintenance: I added a dedicated houseblog page to my site, which allowed me to put up a list of shame projects in progress, and also hopefully made the houesblog more visible than it was previously.

I wanted to use the progress bars that Houseblogs.net provides (as seen on HouseInProgress), but didn’t want to allow use of <object> tags on my site. So I looked around and found a pure CSS solution, which seems a little lighter weight.

Man, it’s scary looking at that list just how much we have to do. And I’m probably forgetting some things, like bathroom remodels…