
Have you ever noticed that very few people make stereo cabinets any more? All you can find in most stores is the “entertainment center,” big walls of wood or particleboard designed to hide all your equipment away. Those of us blessed with a nice big fireplace as the focal point of our small family rooms don’t really have a lot of places to put an entertainment center, though. Our solution, until this weekend, was to use the rolling metal cart that we bought when we were living in our Worthington Place apartment in east Cambridge. The cart fit the aesthetics of that apartment—big, loft-like, exposed pipes & brick—but not our 1941 Cape Cod-style living room. (The steel cart didn’t go well with the dentil molding under the mantel.) So we decided to start looking for a cabinet that would both hold our electronics and fit our aesthetics.
The trick was dimensions. If you stack all our equipment in one pile, it’s about 25 inches—but that doesn’t include the height of supporting shelves or air clearance for ventilation. More pressingly, most home electronics components are about 17 inches wide and 14 inches deep, with some, like our DVD player reaching as much as 22 inches in depth. There are very few cabinets available that approach those dimensions.
But we finally found one—at Crate and Barrel. They call it the Springdale Cabinet, but it looked like a stereo cabinet to us! The issues: the DVD player wouldn’t fit (too deep) and there were no holes to run cables in the back. Fortunately both of those were simple problems to rectify.
After assembling the cabinet, we loaded it with the components, without cables, to identify where each component would sit. We took into account a few key things, such as heat production and headspace, as well as the location of the one fixed shelf in the unit. That dictated the final placement of the components. I would have preferred to put the amplifier higher in the stack, since it produces the most heat, but the number of ways I could load the shelves in was limited. I did, however, make room for our turntable for the first time in about eight months, which was pretty cool.
I then took a pencil and marked the location of access holes on the inside of the cabinet. Some components, like the CD or the turntable, could get a way with a single one-inch hole through which power and audio cables could pass. Others needed bigger holes: the DVR needed a wide slot, the amplifier a large open rectangle, and the DVD needed a hole as wide and tall as it was so that the excess depth could extend through the back of the cabinet. Fortunately the back panel doesn’t provide a lot of structural support for this cabinet since I was cutting so much out of it.
I then cut the holes. For the simple one inch holes and the slot for the DVR I used a one-inch spade bit and simply cut the holes. For the larger panels, I used a smaller spade bit and marked the four corners of the hole, then went to the back of the cabinet and used a straight edge and a jigsaw to connect the holes. It was a little loud, but only took a few minutes to complete all the cuts.
Loading everything back in and getting the cables connected took the longest, but fortunately I had made notes about which inputs were connected to which and everything was pretty straightforward. We hooked it up and turned it on and it worked the first time. Sweet.
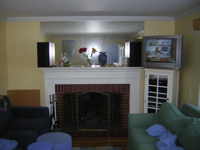
We now have a much less obtrusive AV cabinet that fits the architectural details of our room much better. The only compromise we had to make was TV placement—unlike an entertainment center, the cabinet left no place for our conventional 27″ tube, so we ended up sitting it atop the cabinet. When we pick up some additional income streams and buy a flat panel, we’ll be able to place it on the mantel and slide the AV cabinet further back into the corner—making it disappear that much more.
I took some pictures as I was loading everything in that show the holes we cut and the hidden extra airspace for the DVD player. You can see a little of the “before” in the first picture of this album.