
The Old House My House blog on the This Old House site broke the news of lead tile contractor Joe Ferrante’s death. Obviously any death from heart failure is tragic, but this one hits me for a variety of reasons. The tile work always seemed to me to be closest to a black art of any of the trades on the show, and I always enjoyed watching Joe demystify the work while still making clear how much effort and intelligence was really needed to do it right. My heart goes out to his family and the TOH crew.
Category: Houseblog
Surprise home projects
I hadn’t planned to have any work done on the house this weekend—it’s been kind of a long week. But opportunity knocked—in the form of a paving contractor.
One of the things I haven’t liked about our house since we moved in is our road. Our neighbors are fine—it’s the actual pavement that is problematic. Like a lot of people in Arlington, we live on a private road—what this means is that the city doesn’t do anything about paving, sidewalks, or storm sewers, and we get a break on rules about things like on-street parking. It’s not a great trade-off if you have a driveway, like me. The biggest issue we have is that the last time the neighborhood association had the street paved, they left an unpaved triangular strip, about a foot wide at the widest, where our property line angles away from the street. It picks up road sand and salt, grows weeds, and generally annoys us. Add to that—the pavement that was there wasn’t level, and we generally had a big puddle in front of our house after a rainstorm. But I didn’t really figure on doing anything about it.
Until the paving contractor showed up to do our neighbor’s driveway—acting quickly, professionally, with a crew of about eight guys, they had the work well in hand before 9:30 in the morning. I knew they would be working on our next-door-neighbor’s curb, so I asked the foreman for a quote.
Before noon, the crew had laid in new asphalt right up to the curb, level from one end of the property to another, with no place for a puddle to form and no room for mud. Plus they fixed a huge crack in our sidewalk for free.
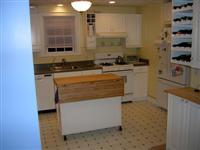
IKEA hacking 2: wraparound counter
We wrapped another kitchen/dining room project this weekend. Where prior projects had put cabinetry on the opening between the dining room and the kitchen, this new project put a wall + base cabinet combo around the corner, in the dining room. The placement echoes the corner cabinet directly opposite, but doesn’t try to be a corner cabinet. But we did want to keep continuity with the kitchen cabinetry. Specifically, I wanted to use a single countertop surface that would wrap around the outside corner from the existing cabinets to the new ones.
This turned out to be a little more challenging than I thought. I had to construct it in two pieces, and had to do a fair amount of trimming. We are using very narrow base cabinets (really just wall cabinets mounted on legs and hung so that they stand on the floor), so I had to trim the IKEA butcher block countertop that I had purchased. Fortunately, I had already done this for the doggy bench, so it was just a question of getting enough crap cleaned out of the garage so I could set up the sawhorses and run the circular saw. This time I managed to make the cut straight and clean, so I was able to rough it in pretty quickly.
The challenging part was the transition. I saw three options: a mitered cut that would come to a point, a straight line transition that would have left a triangle of linking surface between the two cabinet tops, or a curved transition. Lisa wanted the curve, so I gulped and worked it out. I used a piece of string stretched between an awl (for a fixed point) and a pencil to draw the semicircle, then bullied my poor SkilSaw, which really isn’t intended to cut one-inch butcher block, into negotiating the curve. Amazingly it turned out pretty well, especially after I sanded it down with the orbital sander.
I have a few things left to do before I post pictures: I want to put a piece of trim on the back of the countertop to mask the fact that the wall isn’t square; use some putty or something to mask the transition between the pieces; and put the plinth on the base. But the whole project was a strict weekend: hang two cabinets, doors and hardware, and cut and mount the butcher board including the transition. It was actually kind of fun.
Hooked on Ikea
I am starting to think I may need an intervention.
I have three lengths of trim waiting installation for the kitchen; two new Akurum cabinets to mount to add storage to an underutilized 30″ wall in the dining room; and a bunch of spare shelves to mount in the garage. But I see this post on Ikea Hacker about turning extra Pax Wardrobe shelves into storage for odd-shaped nooks, and all I can think about is how this would make the space under the basement stairs so much more manageable. And how I need to pick up some missing parts for one of those Akurum cabinets, so I could just check out the as-is section while I’m there…
This is how madness happens.
The thaw
It’s been in the 50s, almost the 60s, here for the past couple of days, and the ice is slowing withdrawing into the shadows. The worst of it at our house continued to be the ice pond over the French drain. As late as Sunday it was still a solid block of ice.
I came home last night to find that it was mostly water, but still a standing pool—not draining. I looked closer at the one big chunk of ice that was left and realized that it sat over the drain, so I took a pair of downed branches and levered it away. What did I see? The grate of the drain—with ice visible through the holes. So I flipped the drain gate out of the way, and saw a solid block of ice going down into the mouth of the drainpipe. Insert heavy sigh.
Fortunately, getting the grate off provided other places for the water to escape, so by the time Lisa and I got home from dinner the pond was drained for the first time since Valentines Day. Going forward, I’ve got to figure out a method to keep that drain clean.
I’ve been hacked!
Ikea Hacked, that is. My Värde doggie bench was just featured on Ikea Hacker. Thanks to Jules for the linkage.
IKEA Hack finished: Värde Doggie Housebench
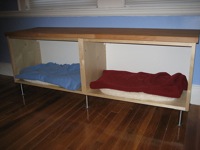
As detailed on these pages back in October, I started our first real IKEA Hack project at the tail end of the kitchen renovation. We wanted a bench for the dining room and a place for our Bichons to sit while we ate. In October, I did the first part of the project—building the carcass of the bench from two 27 inch Värde wall cabinets, fastened side by side, and six Capita legs. And there the project sat while we finished the kitchen and took care of some other work around Christmas. I did manage to trim down a section of a Pronomen countertop, which had been in temporary use in our kitchen before we started the project
This weekend I finally got around to finishing the project, which entailed fastening the countertop to the bench base with 1 3/4 inch #10 Phillips screws. If I had to do it over again, I would have laid some felt down between the countertop and the bench carcass, because I notice an occasional squeak from the bench. But overall it’s a pretty functional unit, and it’s rock solid. And the dogs love it—we put in 24″ dog beds and now if we’re in the dining room, they’re in the bench. If they’re not begging, that is.
Photos from both stages of the project, now including the finished bench top, are on Flickr.
New year, new project
Happy 2007! Everyone in the Jarrett House is waving or wagging at you, hoping you will have a wonderful and prosperous New Year.
And it was only 12 hours into the new year that I broke out a house project. Specifically: completing the media wiring that is installed under the wine cabinet in the kitchen. Today’s task was getting the phone jack working, and I learned a few lessons along the way.
While the new wall was open during the construction of the new opening between the dining room and the kitchen, I insisted that we spend a little extra money and get the electrician to run phone, network, and coax to an outlet over the little desk—because, after all, it would be much harder to make that run afterwards. The electrician ran two lengths of Cat-5 and coax up through the wall and connected it to jacks in an outlet, but didn’t connect it to the structured media wiring panel—not that I asked him to. I figured that doing so would be a pretty straightforward task. Heh.
The project as I saw it would take two steps for each cable:
- Finish running the cable from its current drop location in the garage to the structured media panel in the utility room.
- Tie each cable into the appropriate part of the panel.
Step 1, however, took a lot longer than I anticipated. Snaking the wires along the existing infrastructure took a long time, fighting every step of the way to keep the cables from tangling or binding. Then came Step 2. I confidently hooked the phone line into the block in the structured media panel, hooked in a test phone… and nothing. No dial tone.
Aside: We activated a second phone line to the house last month, and decided that this would be what we would use at the new kitchen desk. This information becomes relevant shortly.
With no dial tone, I knew I had to check a few things. So I pulled the outlet cover off to verify the colors of the wires that were connected to the jack, then double checked how I had wired it at the block. Because I wanted to make the second line primary on this unit, I had tied the blue and white pair from the Cat 5 to the second block on the phone jumper unit in the box. This was tied to the yellow and black pair coming in from the outside (Cat 3) wire and should have connected the primary line for that jack to the second line coming in from the street. But it still wasn’t working.
Everything looked correct inside the house, so I stepped outside in the freezing rain to check the outside wires. And I discovered that back in 2004, I had only hooked up one pair of wires in my hurry to get the phone working. Aha! So I returned with a wire stripper and connected the second yellow and black pair to the terminal for the second phone line…
And it still didn’t work. Now I was getting mad. So I checked a few things and realized that inside I had connected the yellow black pair with yellow first, but I had switched them outside. So I corrected the error outside and tried again… still no love.
And then I had an aha-erlebnis. I ran back upstairs and plugged the phone into the network jack instead of the phone jack… and got a dial tone. The Cat 5 line for the network jack was the one that I thought was the phone line, and vice versa. Not having done that initial wiring myself cost me a good hour of confusion and frustration—and I’ll still have more work to do to finish the job because the other cat 5 line isn’t long enough to reach the structured wiring box. But the second phone line is working, and there was no bloodshed. Hey, I’ll take it.
Houseblog confessions: the mailbox
It’s been a while since I did anything non-kitchen-related on the house, but the time had come. Today I finally got around to hanging a mailbox by our front door.
This may strike some as odd, since we’ve been living in the house for over two years, but until we replaced the front door last November we had a mail slot. This we opted to do away with after much debate. We appreciated not having to stop the mail and just letting it pile up in our foyer when we went on vacation, but we didn’t appreciate the mail slot’s tendency to let the foyer equilibrate with the outside temperature.
Thus vanished the mail slot. And for the last year the mailman has been leaving our bills, junk mail, and magazines (because that’s all that comes by mail any more, practically) either inside our screen door or on our side porch. Which is ok except in the pouring rain. And, you know, we’ve had some of that lately.
So did we opt for a period mailbox? Perhaps one of these fine numbers from Restoration Hardware or Architectural Mailboxes? Or even an antique reproduction?
Reader, we did not. We got the $24.95 cheapie mailbox from Home Depot—so cheap they don’t even have it on their web site. Looks like anodized aluminum, bends like a tin can, but hopefully it’ll do its job and keep the mail dry.
The unstoppable power of a fully operational kitchen
It has been a long time since our kitchen has been ready for prime time, but since the weekend’s work we now have a couple of meals under our belt and I have to say, I like the setup. On Sunday we roasted a chicken—about the simplest recipe I know (stuff two lemons into the cavity of the chicken, salt and pepper, close the cavity, cook at 350° breast side down, flip the bird over, and finish at 425°, monitoring breast temperature with a probe), but it went very smoothly.
The redesigned kitchen has some nice work triangles: fridge to sink and prep surfaces, prep to garbage and stove, stove to sink and dishwasher, dishwasher to cabinets and sink). I really appreciated them last night with a more complex meal: gnocchi with mozzarella and meatballs in a tomato and onion sauce. It sounds complex but it’s pretty simple, at least if the gnocci and meatballs are prepared ahead: one can diced tomatoes, an onion peeled and split, some butter and a little salt, simmer for 30 to 45 minutes. Toward the end toss the gnocchi in the boiling pasta water and scoop them out when they float; drop them in the sauce, add meatballs and mozzarella, and park in the oven for 10 minutes. Pretty ambrosial.
The last part of the process: our new SimpleHuman trash can. It felt wrong to have our battered old can in the new kitchen, so we gave the kitchen (and ourselves) a present. The concept of trash can as ceremonial gift isn’t new, of course; check the review of this model which notes it was a gift to the owner’s new condo. Also check out this extensive kitchen hack description, pointed to from the Ikeahacker Blog, that calls the SimpleHuman trash can “lovely…I never thought a really expensive trash can could make me happy.”
Of course, all this trash can talk reminds me of the definitive commentary on trash cans and consumerism in general from Charles Schulz: Charlie Brown buys a new trash can, takes it home and unwraps it, then comments to Shermy that he has to do something with the wrapping paper. Shermy suggests to him that he put it in the trash can, and Charlie Brown says, “Boy! That sure is handy!” — conveniently neglecting to notice that the need that the trash can handily filled was created by it in the first place.
Wrap-up, stage 1…
We returned late this afternoon from New Jersey (a visit to my inlaws which bracketed the HDI ITIM conference in Vegas) to find… done. The contractors had been here this week—plumbers, electricians, painters—and the following was completed:
- Sink and garbage disposal reconnected
- New drinking water filter and tap installed at sink
- Dishwasher installed
- Filter installed in line to icemaker; icemaker active for the first time since refrigerator was installed in 2004
- Under-cabinet light installed at the butler’s station
- Front door and shutters painted
- Flaking trim painted inside
- Bathroom door painted
- New toilet installed in bathroom
- Lots of trash removed from the garage
There’s a lot left to do, but the ongoing Flickr set documents some of the more dramatic changes in the kitchen.
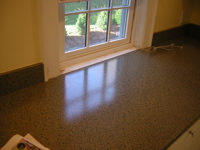
Finally, counters
Unbelievably, at long last we have countertops. And they’re even installed.
The counters were one of the areas where we scrimped in the kitchen redo. We wanted to do solid surface (granite would be a little impractical for us right now) but couldn’t really justify the budget, so we went laminate. I’m kind of glad we did at this point, though, since the installed counters look great and didn’t cost nearly the amount that we would have splashed out on solid surface. The budgetary numbers we used were around $800 for the laminate counters (it ended up being a little higher due to complications in the installation), or about half the cost we were seeing for some solid surface or stone tops.
The biggest issue we faced in the installation was a window whose sill came below the installed counter height. We knew it was there when we planned the counter run but figured we could work around it. Our installer earned his pay by painstakingly chiseling the existing sill back so that he could bring the countertop to the wall, then bringing the remaining sill up to counter height. You would never know there was ever a problem if you looked at it now.
Pictures will be posted in the next few days once I caulk and do a few more finishing steps. But in the meantime, our plumbing gets reconnected on Friday—along with the long-awaited dishwasher. Can’t wait…
Flying with a cold
There’s only one thing I hate more than comment spam, and that’s flying with a cold. Partway into Saturday night’s performance, the cold came down like a big hammer and I barely sniffled my way through.
I managed to rally enough yesterday to finish our remaining kitchen cabinetry, a small pantry/desk area consisting of a 24″ IKEA wall cabinet modded with legs as the base cabinet, plus a wine rack and a 12″ wall cabinet above. It’s all done but the plinth and the countertop; pix forthcoming.
And our countertops for the rest of the cabinets have arrived and will hopefully be installed during the early part of this week… so we can get our sink and get our dishwasher installed.
Bad home improvement hacks
Via BoingBoing, a great collection of photos from home inspections gone horribly horribly awry, courtesy our good friends at ThisOldHouse.com. In the first gallery, you have to check out the crawlspace water feature (also known as an unconnected tub drain); be careful of the rodent photos in the second gallery.
IKEA hacking for kitchens and dogs

A little more work on the kitchen this weekend. I installed the molding strips under our wall cabinets (check the master kitchen renovation photoset, starting here, for the details), which was slightly more complicated than I expected. Cutting and mitering the strips was a cinch thanks to my miter saw, but I had to shape them around the molding strip on the back wall (visible in this photo) and that took a little longer. Fortunately the jigsaw made relatively quick work of that step, and I was able to get clean cuts along my rough penciled cut out lines.
The final step, mounting them, also proved challenging. We bought the molding strips upwards of three months ago, and I could only locate hardware for one set of molding—not nearly enough L-brackets to finish the job. (Note: for some reason, the molding strips I got did not include hardware in the box, but apparently the newer ones do). So I made a run down to Stoughton (where we needed some other things anyway) and got the returns department to give me eight of the brackets I needed to finish the job. The nearly final product (still awaiting caulking) is in the photoset, along with two filler panels at the end of the cabinet run. (That part gave me fits until I figured out that I could simply use construction adhesive to connect the filler panel to the cabinets.)
Along the way I found time to have a little fun for our dogs. We got two 27 inch long Värde wall cabinets from IKEA which were originally intended to form part of a butler’s pantry, but we didn’t like the way they looked. Fortunately, Lisa had a brainwave and suggested we take the doors off and put beds in. Originally we tried doing this with the cabinets stacked atop each other, but fortunately for all concerned we figured out a bench layout would be best. So I connected the two cabinets together with four of the connecting screws that IKEA thoughtfully provides in just about every box, put six Capita legs underneath, and slid some spare beds inside. The dogs seem to like it, as evidenced by the photos. The final step will be to cut up the butcher-block countertop that is currently temporarily resting on part of our cabinets and screw it on top of the bench as a seating surface—probably with a cushion. Maybe when that step is completed I’ll send this into the IKEA Hacker Blog.